Learning Objectives
Create Windows
Learn to create and configure JFrame windows
Add Components
Master buttons, text fields, labels, and more
Layout Managers
Arrange components with FlowLayout, BorderLayout, GridLayout
Event Handling
Respond to user interactions with action listeners
Introduction to Java Swing
What is Swing?
Swing is Java's primary GUI toolkit for building desktop applications. It provides a rich set of components like windows, buttons, text fields, and more. Swing is part of Java Foundation Classes (JFC) and is platform-independent.
Common Swing Components
Here are the most frequently used Swing components you'll work with:
JFrame
The main window container for your application
JButton
Clickable buttons that trigger actions
JLabel
Display text or images (read-only)
JTextField
Single-line text input field
JTextArea
Multi-line text input area
JCheckBox
Checkboxes for multiple selections
JRadioButton
Radio buttons for single selection from options
JComboBox
Drop-down list/menu selector
JPanel
Container for grouping other components
JMenuBar
Menu bar at the top of windows (File, Edit, etc.)
JScrollPane
Adds scrollbars to components
JOptionPane
Shows popup dialog boxes (alerts, confirmations)
Console vs GUI Applications
Console
Text-based input/output using Scanner and System.out
GUI (Swing)
Visual interfaces with buttons, text fields, and windows
Creating Windows with JFrame
Your First Window
JFrame is the main window container in Swing. Every GUI application needs at least one JFrame.
// Import the Swing library - this gives us access to GUI components
import javax.swing.*;

public class FirstWindow extends JFrame {

    // Constructor - sets up the window
    public FirstWindow() {
        // Step 1: Set the window title
        // Think of JFrame as a blank canvas for your app
        setTitle("My First Window");

        // Step 2: Set the window size (width, height in pixels)
        // 400 pixels wide, 300 pixels tall
        setSize(400, 300);

        // Step 3: Tell the program to exit when user closes the window
        // Without this, your program keeps running in the background
        setDefaultCloseOperation(JFrame.EXIT_ON_CLOSE);

        // Step 4: Center the window on screen
        setLocationRelativeTo(null);

        // Step 5: Make the window visible
        // Windows are invisible by default, so we need to show it
        setVisible(true);
    }

    // Main method - program starts here
    public static void main(String[] args) {
        // Create the window (constructor automatically shows it)
        new FirstWindow();
    }
}
Visual Preview:
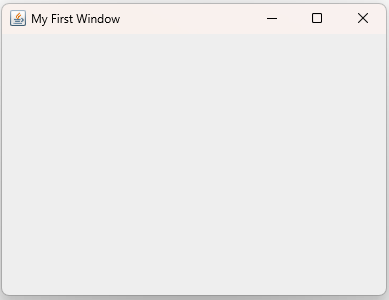
This creates a simple empty window titled "My First Window" with dimensions 400x300 pixels, centered on the screen. The window has standard title bar controls (minimize, maximize, close) and exits the application when closed.
JFrame Properties
Common properties to configure your window:
// Create a window with a title bar
JFrame frame = new JFrame("Title");

// Set window dimensions (width: 600px, height: 400px)
frame.setSize(600, 400);

// Position window at specific coordinates on screen
// X=100 pixels from left, Y=100 pixels from top
frame.setLocation(100, 100);

// OR center the window on the screen
// null = center relative to nothing (the screen itself)
// You can also pass another window: frame.setLocationRelativeTo(parentWindow);
frame.setLocationRelativeTo(null);

// What happens when user clicks the X button?
// EXIT_ON_CLOSE = close window AND exit program
frame.setDefaultCloseOperation(JFrame.EXIT_ON_CLOSE);

// Can the user resize this window?
// false = window size is fixed (user can't drag edges)
// true = user can make window bigger or smaller
frame.setResizable(false);

// Finally, display the window (windows start invisible)
frame.setVisible(true);
Using Inheritance
A better approach is to extend JFrame:
import javax.swing.*;

// "extends JFrame" means MyWindow IS A JFrame
// It inherits all JFrame's abilities (methods and properties)
public class MyWindow extends JFrame {

    // Constructor - runs when you create a new MyWindow
    public MyWindow() {
        // We can use setTitle() directly (no need for "frame.")
        // because MyWindow IS a JFrame
        setTitle("My Application");
        setSize(500, 400);
        setDefaultCloseOperation(JFrame.EXIT_ON_CLOSE);
        setLocationRelativeTo(null);  // Center on screen
        setVisible(true);
    }

    public static void main(String[] args) {
        // Create our custom window (constructor automatically shows it)
        new MyWindow();
    }
}
Swing Components
JLabel - Display Text
Labels display text or images that users cannot edit.
// Create a label with text (like a sticker with words on it)
// Users can SEE this text but can't change it
JLabel label = new JLabel("Hello, World!");

// Add the label to our window
frame.add(label);
JButton - Clickable Buttons
Buttons allow users to trigger actions.
// Create a button with text on it
// Users can click this to do something
JButton button = new JButton("Click Me");

// Add the button to our window
frame.add(button);
JTextField - Text Input
Text fields allow users to enter single-line text.
// Create a text input box
// 20 = width (can hold about 20 characters)
JTextField textField = new JTextField(20);
frame.add(textField);

// Get whatever text the user typed
String text = textField.getText();

// Put text into the field (program fills it)
textField.setText("Hello");
JTextArea - Multi-line Text
Text areas allow multi-line text input.
// Create a multi-line text box
// 10 = number of rows (lines), 30 = number of columns (width)
JTextArea textArea = new JTextArea(10, 30);

// Wrap text area in a scroll pane
// This adds scrollbars if text is too long
JScrollPane scrollPane = new JScrollPane(textArea);

// Add the scroll pane (which contains the text area) to window
frame.add(scrollPane);
JPasswordField - Password Input
Password fields hide the text as the user types (shows bullets/dots).
// Create a password field (text appears as ••• for security)
JPasswordField passwordField = new JPasswordField(20);
frame.add(passwordField);

// Get the password (returns char array for security)
char[] passwordChars = passwordField.getPassword();

// Convert to String if needed
String password = new String(passwordChars);
JCheckBox - Checkboxes
Checkboxes allow users to select multiple options.
// Create checkboxes (user can check multiple)
JCheckBox checkbox1 = new JCheckBox("Option 1");
JCheckBox checkbox2 = new JCheckBox("Option 2");
JCheckBox checkbox3 = new JCheckBox("Option 3", true); // true = checked by default

frame.add(checkbox1);
frame.add(checkbox2);
frame.add(checkbox3);

// Check if a checkbox is selected
if (checkbox1.isSelected()) {
    System.out.println("Option 1 is checked");
}
JRadioButton - Radio Buttons
Radio buttons allow users to select only ONE option from a group.
// Create radio buttons (only one can be selected at a time)
JRadioButton option1 = new JRadioButton("Small");
JRadioButton option2 = new JRadioButton("Medium");
JRadioButton option3 = new JRadioButton("Large");

// Group them together (ensures only one can be selected)
ButtonGroup group = new ButtonGroup();
group.add(option1);
group.add(option2);
group.add(option3);

// Add to frame
frame.add(option1);
frame.add(option2);
frame.add(option3);

// Check which one is selected
if (option1.isSelected()) {
    System.out.println("Small selected");
}
JComboBox - Drop-down List
Drop-down menus (like a dropdown selector).
// Create a drop-down list with options
String[] options = {"Red", "Green", "Blue", "Yellow"};
JComboBox comboBox = new JComboBox<>(options);
frame.add(comboBox);

// Get selected item
String selected = (String) comboBox.getSelectedItem();

// Add action listener to detect when user selects something
comboBox.addActionListener(e -> {
    String choice = (String) comboBox.getSelectedItem();
    System.out.println("User selected: " + choice);
});
JPanel - Container
Panels are containers used to group and organize other components.
// Create a panel to group related components
JPanel panel = new JPanel();
panel.setLayout(new FlowLayout());

// Add components to the panel (not directly to frame)
panel.add(new JLabel("Name:"));
panel.add(new JTextField(15));
panel.add(new JButton("Submit"));

// Add the entire panel to the frame
frame.add(panel);

// Panels are useful for organizing complex layouts
// You can have multiple panels with different layouts
JOptionPane - Dialog Boxes
Shows popup messages, confirmations, and input dialogs.
// Show a simple message
JOptionPane.showMessageDialog(null, "Hello, World!");

// Show a confirmation dialog (Yes/No)
int result = JOptionPane.showConfirmDialog(null, "Are you sure?");
if (result == JOptionPane.YES_OPTION) {
    System.out.println("User clicked Yes");
}

// Ask for input
String name = JOptionPane.showInputDialog("Enter your name:");

// Show error message
JOptionPane.showMessageDialog(null, "Error!", "Error", JOptionPane.ERROR_MESSAGE);
Layout Managers
FlowLayout
Arranges components left-to-right, top-to-bottom (like text in a document).
Code:
import java.awt.*;   // For layouts (FlowLayout, BorderLayout, etc.)
import javax.swing.*;  // For GUI components (JFrame, JButton, etc.)

public class FlowLayoutDemo extends JFrame {
    public FlowLayoutDemo() {
        // Set layout manager - FlowLayout arranges items like words in a paragraph
        // Components flow left-to-right, then wrap to next line
        setLayout(new FlowLayout());

        // Add three buttons - they will line up horizontally
        // If window is too narrow, they wrap to next line
        add(new JButton("Button 1"));
        add(new JButton("Button 2"));
        add(new JButton("Button 3"));

        setSize(400, 200);
        setDefaultCloseOperation(EXIT_ON_CLOSE);
        setLocationRelativeTo(null);  // Center on screen
        setVisible(true);  // Make window visible
    }

    // Main method - program starts here
    public static void main(String[] args) {
        // Create the window (constructor automatically shows it)
        new FlowLayoutDemo();
    }
}
Visual Preview:
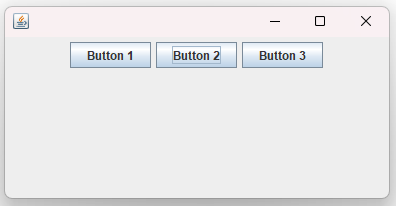
A window showing three buttons arranged horizontally in a row. Components flow from left to right like words in a sentence. If the window becomes too narrow, buttons wrap to the next line automatically.
BorderLayout
Divides container into 5 regions: NORTH, SOUTH, EAST, WEST, CENTER.
Code:
import java.awt.*;
import javax.swing.*;

public class BorderLayoutDemo extends JFrame {
    public BorderLayoutDemo() {
        // BorderLayout divides window into 5 areas:
        // Think of it like a map: North (top), South (bottom),
        // East (right), West (left), Center (middle)
        setLayout(new BorderLayout());

        // Place buttons in each region
        // North button goes at the top (full width)
        add(new JButton("North"), BorderLayout.NORTH);

        // South button goes at the bottom (full width)
        add(new JButton("South"), BorderLayout.SOUTH);

        // East button goes on the right side (full height)
        add(new JButton("East"), BorderLayout.EAST);

        // West button goes on the left side (full height)
        add(new JButton("West"), BorderLayout.WEST);

        // Center takes up all remaining space in the middle
        add(new JButton("Center"), BorderLayout.CENTER);

        setSize(400, 300);
        setDefaultCloseOperation(EXIT_ON_CLOSE);
        setLocationRelativeTo(null);  // Center on screen
        setVisible(true);  // Make window visible
    }

    // Main method - program starts here
    public static void main(String[] args) {
        // Create the window (constructor automatically shows it)
        new BorderLayoutDemo();
    }
}
Visual Preview:

A window divided into 5 regions like a compass: North at the top (full width), South at bottom (full width), East on right (full height), West on left (full height), and Center taking all remaining middle space.
GridLayout
Arranges components in a grid of equal-sized cells.
Code:
import java.awt.*;
import javax.swing.*;

public class GridLayoutDemo extends JFrame {
    public GridLayoutDemo() {
        // GridLayout creates a table/spreadsheet of cells
        // All cells are the same size
        // (3, 3) means 3 rows and 3 columns = 9 cells total
        setLayout(new GridLayout(3, 3));

        // Add 9 buttons - they fill the grid left-to-right, top-to-bottom
        // Like reading a book: button 1 top-left, button 9 bottom-right
        for (int i = 1; i <= 9; i++) {
            add(new JButton("Button " + i));
        }

        setSize(400, 400);
        setDefaultCloseOperation(EXIT_ON_CLOSE);
        setLocationRelativeTo(null);  // Center on screen
        setVisible(true);  // Make window visible
    }

    // Main method - program starts here
    public static void main(String[] args) {
        // Create the window (constructor automatically shows it)
        new GridLayoutDemo();
    }
}
Visual Preview:
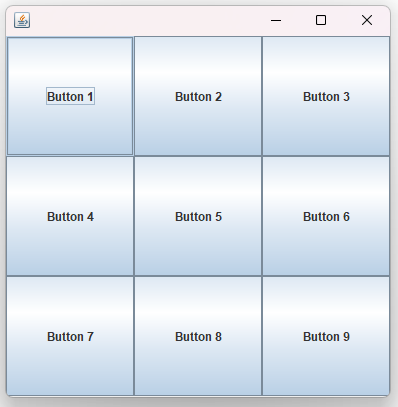
A 3x3 grid (like a tic-tac-toe board) with 9 buttons arranged in equal-sized cells. All cells have the same width and height. Components fill the grid from left to right, top to bottom.
Event Handling
ActionListener for Buttons
Use ActionListener to respond to button clicks.
Code:
import javax.swing.*;
import java.awt.event.*;  // For event handling

public class ButtonDemo extends JFrame {
    public ButtonDemo() {
        JButton button = new JButton("Click Me");

        // addActionListener tells Java: "When this button is clicked, do something"
        // We create a new ActionListener object (a "listener" that waits for actions)
        button.addActionListener(new ActionListener() {
            // This method runs automatically when the button is clicked
            public void actionPerformed(ActionEvent e) {
                // Show a popup message box
                // null = no parent window (dialog appears centered on screen)
                JOptionPane.showMessageDialog(null, "Button clicked!");

                // Using 'this' makes dialog centered on this window instead:
                // JOptionPane.showMessageDialog(ButtonDemo.this, "Button clicked!");
            }
        });

        add(button);
        setSize(300, 200);
        setDefaultCloseOperation(EXIT_ON_CLOSE);
        setLocationRelativeTo(null);  // Center on screen
        setVisible(true);  // Make window visible
    }

    // Main method - program starts here
    public static void main(String[] args) {
        // Create the window (constructor automatically shows it)
        new ButtonDemo();
    }
}
Visual Preview:
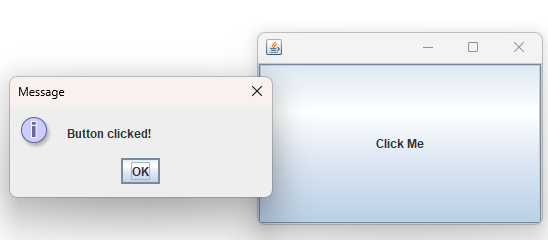
A simple window with a single "Click Me" button. When clicked, a popup dialog box appears with the message "Button clicked!" demonstrating event handling in action.
Lambda Expression (Java 8+)
// Shorter way to write the same thing (modern Java)
// "e ->" means: when event 'e' happens, do this:
button.addActionListener(e -> {
    JOptionPane.showMessageDialog(null, "Button clicked!");
});

// Or use 'this' to center dialog on this window:
// button.addActionListener(e -> {
//     JOptionPane.showMessageDialog(this, "Button clicked!");
// });
Practical Examples
Simple Calculator
Visual Preview:
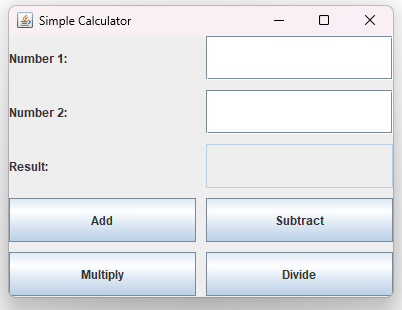
A calculator window with input fields for two numbers, a result field, and four operation buttons (Add, Subtract, Multiply, Divide). The interface uses GridLayout with 5 rows and 2 columns for organized component placement.
Code:
import javax.swing.*;
import java.awt.*;
import java.awt.event.*;

// Our Calculator IS a JFrame (it extends JFrame)
public class Calculator extends JFrame {
    // Variables to store our GUI components (declared at top so all methods can use them)
    private JTextField num1Field, num2Field, resultField;
    private JButton addBtn, subtractBtn, multiplyBtn, divideBtn;

    // Constructor - sets up the calculator when created
    public Calculator() {
        setTitle("Simple Calculator");

        // GridLayout makes a table: 5 rows, 2 columns
        // (10, 10) adds 10 pixels spacing between cells
        setLayout(new GridLayout(5, 2, 10, 10));

        // Row 1: Label and text field for first number
        add(new JLabel("Number 1:"));      // Left cell
        num1Field = new JTextField();       // Right cell
        add(num1Field);

        // Row 2: Label and text field for second number
        add(new JLabel("Number 2:"));
        num2Field = new JTextField();
        add(num2Field);

        // Row 3: Label and text field for result
        add(new JLabel("Result:"));
        resultField = new JTextField();
        resultField.setEditable(false);     // User can't type here (read-only)
        add(resultField);

        // Create the four operation buttons
        addBtn = new JButton("Add");
        subtractBtn = new JButton("Subtract");
        multiplyBtn = new JButton("Multiply");
        divideBtn = new JButton("Divide");

        // Connect buttons to actions - when clicked, call calculate() method
        // We pass the math symbol to know which operation to do
        addBtn.addActionListener(e -> calculate("+"));
        subtractBtn.addActionListener(e -> calculate("-"));
        multiplyBtn.addActionListener(e -> calculate("*"));
        divideBtn.addActionListener(e -> calculate("/"));

        // Add buttons to grid (rows 4 and 5, filling 2 columns)
        add(addBtn);       // Row 4, left
        add(subtractBtn);  // Row 4, right
        add(multiplyBtn);  // Row 5, left
        add(divideBtn);    // Row 5, right

        setSize(400, 300);
        setDefaultCloseOperation(EXIT_ON_CLOSE);
        setLocationRelativeTo(null);  // Center on screen
        setVisible(true);  // Make window visible
    }

    // This method does the math - called when any button is clicked
    private void calculate(String operation) {
        try {
            // Get text from fields and convert to numbers
            // parseDouble turns "123.45" text into 123.45 number
            double num1 = Double.parseDouble(num1Field.getText());
            double num2 = Double.parseDouble(num2Field.getText());
            double result = 0;

            // Do different math based on which button was clicked
            switch(operation) {
                case "+": result = num1 + num2; break;       // Add
                case "-": result = num1 - num2; break;       // Subtract
                case "*": result = num1 * num2; break;       // Multiply
                case "/":
                    // Check for division by zero error
                    if (num2 != 0) {
                        result = num1 / num2;
                    } else {
                        // Show error message and exit method early
                        JOptionPane.showMessageDialog(this, "Cannot divide by zero!");
                        return;
                    }
                    break;
            }

            // Convert result number back to text and display it
            // valueOf turns 123.45 number into "123.45" text
            resultField.setText(String.valueOf(result));

        } catch (NumberFormatException ex) {
            // If user typed letters instead of numbers, show error
            JOptionPane.showMessageDialog(this, "Please enter valid numbers!");
        }
    }

    // Main method - program starts here
    public static void main(String[] args) {
        // Create calculator (constructor automatically shows it)
        new Calculator();
    }
}
Login Form
Visual Preview:
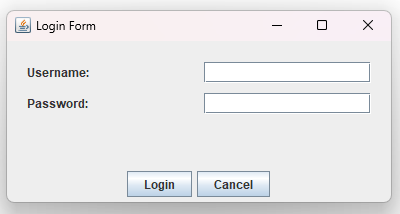
A professional login form with Username and Password fields arranged using BorderLayout. The form panel is centered, and Login/Cancel buttons are positioned at the bottom using FlowLayout for proper alignment.
Code:
import javax.swing.*;
import java.awt.*;

public class LoginForm extends JFrame {
    // Declare components at class level so all methods can access them
    private JTextField usernameField;
    private JPasswordField passwordField;  // Like JTextField but hides password with dots
    private JButton loginBtn, cancelBtn;

    public LoginForm() {
        setTitle("Login Form");
        setLayout(new BorderLayout());  // Main layout: top-center-bottom

        // Create a panel to hold the form fields
        // GridLayout(3, 2) = 3 rows, 2 columns for label-field pairs
        // (10, 10) = 10 pixels spacing between cells
        JPanel formPanel = new JPanel(new GridLayout(3, 2, 10, 10));

        // Add padding around the form (20 pixels on all sides)
        // Makes it look better - not cramped against edges
        formPanel.setBorder(BorderFactory.createEmptyBorder(20, 20, 20, 20));

        // Row 1: Username label and input field
        formPanel.add(new JLabel("Username:"));
        usernameField = new JTextField();
        formPanel.add(usernameField);

        // Row 2: Password label and input field
        formPanel.add(new JLabel("Password:"));
        passwordField = new JPasswordField();  // Hides what user types (shows •••)
        formPanel.add(passwordField);

        // Create a separate panel for buttons at the bottom
        JPanel buttonPanel = new JPanel(new FlowLayout());
        loginBtn = new JButton("Login");
        cancelBtn = new JButton("Cancel");

        // When Login button is clicked, check username and password
        loginBtn.addActionListener(e -> {
            // Get what user typed
            String username = usernameField.getText();

            // getPassword() returns char array, convert to String
            String password = new String(passwordField.getPassword());

            // Simple check: is username "admin" AND password "1234"?
            if (username.equals("admin") && password.equals("1234")) {
                JOptionPane.showMessageDialog(this, "Login successful!");
            } else {
                JOptionPane.showMessageDialog(this, "Invalid credentials!");
            }
        });

        // When Cancel button is clicked, clear both fields
        cancelBtn.addActionListener(e -> {
            usernameField.setText("");      // Clear username
            passwordField.setText("");      // Clear password
        });

        // Add buttons to button panel
        buttonPanel.add(loginBtn);
        buttonPanel.add(cancelBtn);

        // Add panels to main frame using BorderLayout positions
        add(formPanel, BorderLayout.CENTER);    // Form in center
        add(buttonPanel, BorderLayout.SOUTH);   // Buttons at bottom

        setSize(400, 200);
        setDefaultCloseOperation(EXIT_ON_CLOSE);
        setLocationRelativeTo(null);  // Center on screen
        setVisible(true);  // Make window visible
    }

    // Main method - program starts here
    public static void main(String[] args) {
        // Create the login form (constructor automatically shows it)
        new LoginForm();
    }
}
Swing Component Hierarchy
| Component | Purpose | Example |
|---|---|---|
| JFrame | Main window container | new JFrame("Title") |
| JPanel | Container for grouping components | new JPanel() |
| JButton | Clickable button | new JButton("Click") |
| JLabel | Display text or images | new JLabel("Text") |
| JTextField | Single-line text input | new JTextField(20) |
| JTextArea | Multi-line text input | new JTextArea(10, 30) |
Summary
In this module, you've learned:
- ✓ How to create windows using JFrame
- ✓ Adding components like buttons, labels, and text fields
- ✓ Using layout managers (FlowLayout, BorderLayout, GridLayout)
- ✓ Handling button clicks with ActionListener
- ✓ Building complete GUI applications
- ✓ Creating forms and dialogs
- ✓ Event-driven programming concepts